

Artisan Bookbinding for Authors
Indie authors, by definition, are independent. Yes, some of us license rights to partners to extend our influence, but many prefer to control every aspect of their business. Indeed, a lot advocate for total independence, even from retailers. You may, for instance, have created your own ebook files and sell directly through your website. But how independent do you want to be? Would you consider sidestepping retailer print-on-demand options to sell direct? In 2022, fantasy author Brandon Sanderson deployed that exact strategy and generated a limited run of swag boxes readers could only get through Kickstarter. This effort turned over almost $42 million.
There’s no doubt, though, that Sanderson still outsourced to manufacturers, harbouring an element of dependence. Can you go further? Sure, you could produce books yourself. Creating artisan editions of your work isn’t scalable, but the strategy is totally independent and produces unique books that appeal to collector-readers, which few authors ever reach. What it lacks in scalability, the activity makes up for in setting apart your brand from your competition. Today’s post will cover the basics of artisan book production, enabling you to produce products that the average indie author could never fulfil without the help of a manufacturer.
Understanding the art of bookbinding will upskill your author knowledge, providing real benefit, whether you want to master the physical process yourself or have informed conversations with printers to produce unique, limited print runs. In recent years, this independent route has become neglected ground that many authors believe to be unprofitable when deployed on a micro scale. However, any author can produce profitable artisan books for a relatively low cost, even on a small scale, and provide a unique product that does wonders for nurturing reader engagement. All you have to do is learn the process and master the craft.
Start with Materials
Bookbinding begins by asking yourself an important question: Do I want to create a modern-looking book or one with a traditional aesthetic? If you want to create a slimline, modern-looking one then you can simply begin with a stack of individual page leaves. If you want to create a thick one that looks more handcrafted, though, you will need to begin with pages printed on signatures. These are groups of four sheets folded in half to create eight leaves, which you fix together and encase in a cover. Working out what style of bookbinding you want to achieve beforehand allows you to print interior PDF files that will later align your pages in the correct order.
Choosing the rest of your raw materials from that point onward is easier. In total, as well as your interior paper, which can be whatever stock you choose, you will also need:
- Book board to form the cover
- Book cloth to wrap the cover
- A needle and thread if you’re using signatures
- Wax, mull and glue for support
First, we will focus on creating a book from signatures for those who want to create a traditional-looking product with added strength. However, if you want to use individual leaves, simply skip to the “Create a Cover” section. For now, though, begin by cutting your thread into two-foot-long lengths, waxing them to reduce the risk of knotting, and gather your printed PDF pages into signature groups.
Create a Text Block
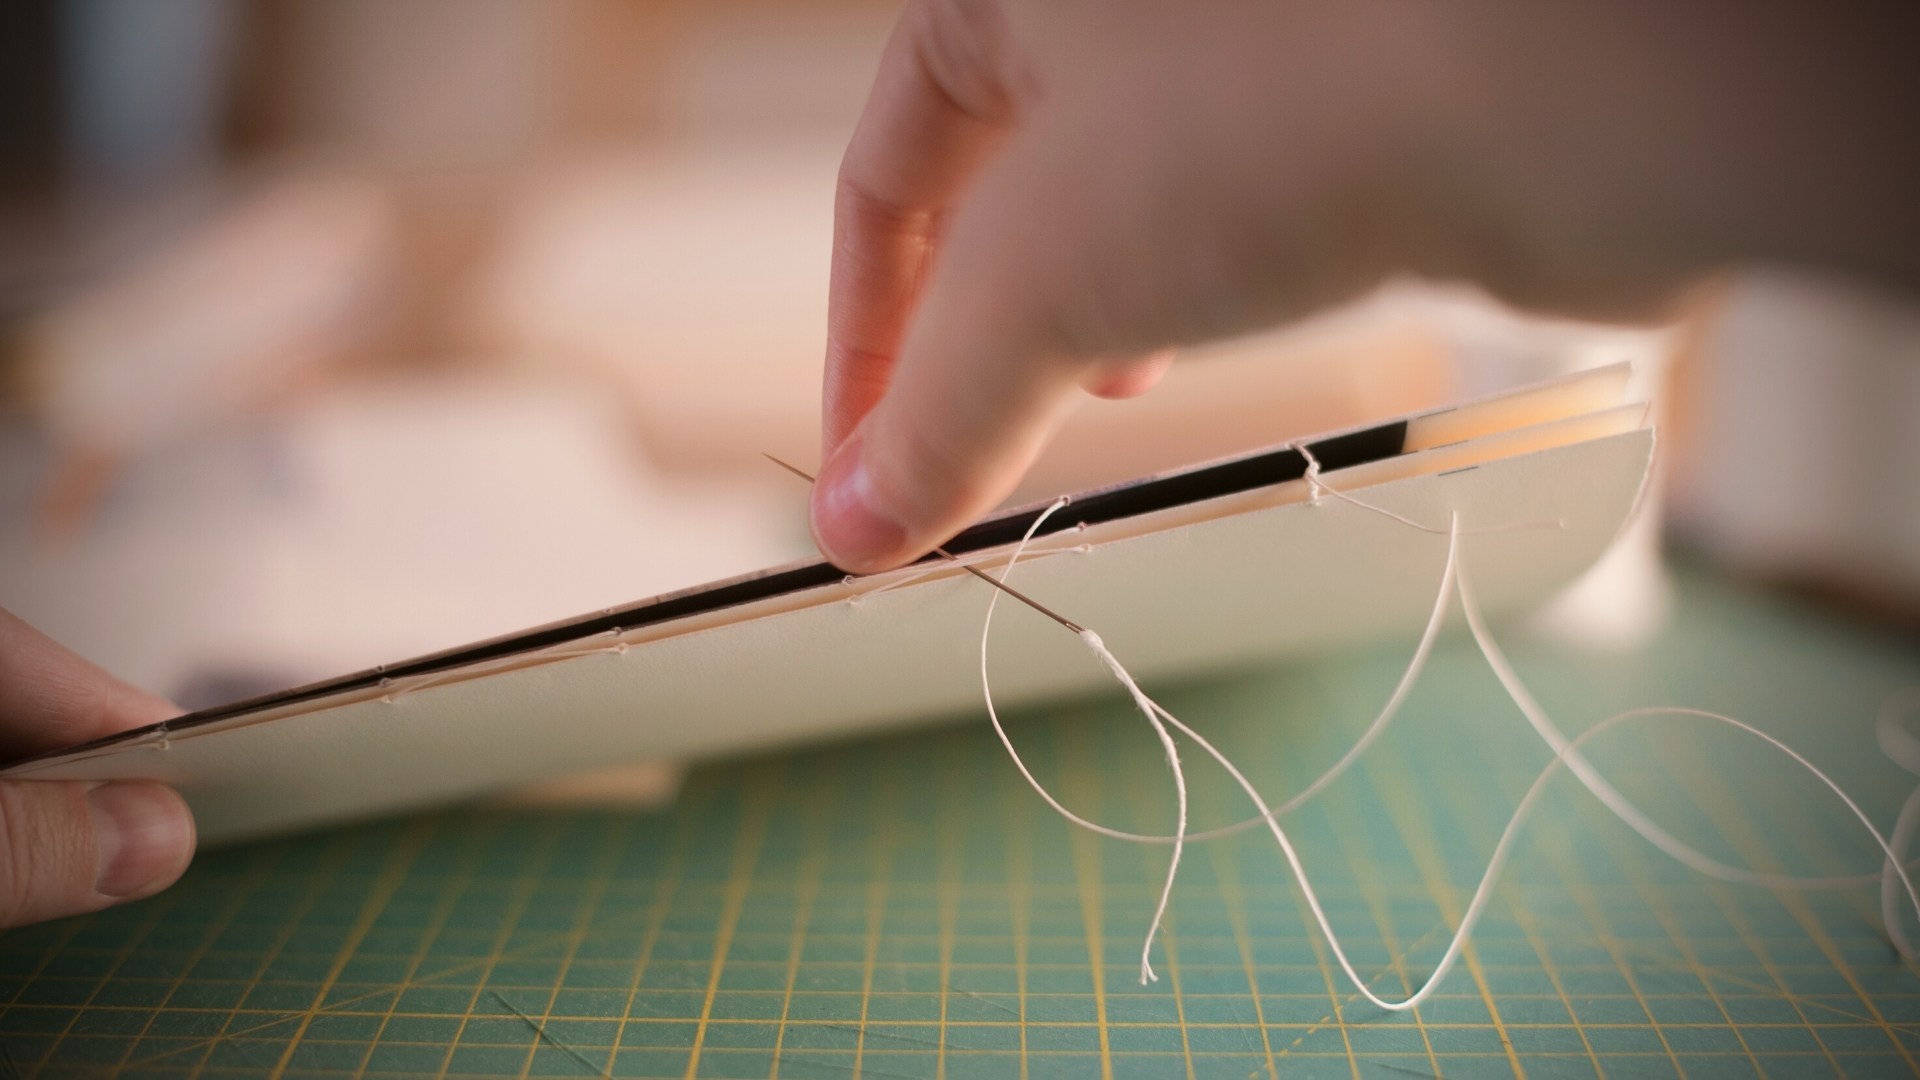
A “text block” is a stack of interior pages that sits inside a book’s cover. To create one, fold four pieces of paper in half into a signature then clamp multiple signatures together between protective boards. Saw shallow notches across the spines in six places to produce thread holes. Then release your signatures and kettle stich your first, starting with a knot tied outside the fold. When you complete one signature, continue to the next using the same thread until all are connected. If you run out of string, knot it on the outside and continue with a fresh piece. Plenty of YouTube tutorials provide “bookbinding kettle stitch” directions so search that if you get stuck.
What comes next depends on whether you want a flat or curved book spine. To achieve the former, clamp the text block with the signature spines flush against each other and plane the opposite edge to ensure smooth page edges. For the latter, lightly hammer the exterior signatures in your text block to give the book a convex spine. Doing so will cause the page edges to appear concave. As an additional feature, you can also choose to keep your pages clamped then talc and stain the edges, or guild them with gold foil for a luxurious effect. Keep the clamp tight to ensure no colour bleeds too deeply into your page edges. This final step completes your text block.
Create a Cover
Re-clamp your text block at this stage to ensure you maintain alignment while gluing your spine. You will need to combine the glue with mull to ensure your signatures are thoroughly secured once released from the clamp. Mull is a weaved cotton cloth that’s specially designed to provide extra adhesive structure to book signatures. Place a strip of mull along your spine and paint glue into its porous folds for sturdiness. Also, be sure to press the mull into the grooves between signatures while it’s soaked with glue. Then leave the whole thing to dry. This process will give you a secure book spine but one that’s flexible enough to bend when readers turn pages.
Next comes a hardback cover. To create this element, cut your book board into three sections — one for the back cover, one of the front, and a thin one for the spine. Remember to leave an overhang when cutting these elements to ensure the cover properly extends beyond the text block that sits inside it. Then move onto the book cloth that will enwrap the book board components. Cut your book cloth large enough to cover all three book board pieces, including a 7-millimetre gap between them and a 20-millimetre border around the entire set. Glue them in place when you have the correct size, then smooth out any bubbles and leave the cover to dry under a weight.
Connect the Pieces
By now you should have a dry cover and interior. However, the pieces will still be messy and disconnected. To neaten your cover, cut the loose corners off your book cloth at a 45 degree angle. That way, you can plan to fold the top and side overhangs around your book boards without having to double-fold the corners. While that’s still loose, choose colourful end paper to wrap around your text block. For best results, ensure it’s the correct trim size and stick the text block spine directly down the centre. If the alignment is unbalanced, your finished book will not sit flat. Once it’s straight, though, dry your mull-covered spine securely against the end paper.
Now we can connect your book’s interior and exterior, bringing together the major components. The front cover is a good place to start. To connect the elements, press the front section of your end paper to the front book board on the inside of the cover, ensure it’s centred between the top and bottom. Next, score grooves in the 7-millimetre spaces between your book boards to offer slack that will allow your book to close when glued. Then follow the same process for the back cover. When all elements sit in appropriate places, glue the end papers in place and wrap the loose book cloth around the edges, gluing the tabs into place. Clamp the book until dry.
Add Finishing Touches
Congratulations — you have a book! Admittedly, it won’t have all the physical features of a finely crafted hardback yet, but the book should be structurally complete. Put it on a shelf and it shouldn’t look out of place among other hardback. You’ll need to add some finishing touches, though, if you want it to wow your readers. What sort of finishing touches? That depends of what kind of effect you want to achieve. For example, you could use a shaping tool to deboss your cover and press gold leaf into the grooves for decoration. This process will give your book a traditional, classy look. Alternatively, you could cover it in faux precious stones or ribbon.
If you want to level up the perceived value, perhaps bundle your book with other items as part of a merch box. Say, for instance, you write archaeological action thrillers, try pairing it with hand-made scrolls or “excavated” objects collector-readers can display in their homes. For romance, consider padding your book with characters’ love letters or velvet. If you write fantasy, bejewel each copy with a unique assortment of crystals and provide information about their magical properties. When it comes to hand-crafting books, you can charge a high-ticket price that turns a reasonable profit, even when creating something truly special for devoted readers.
Indie authors have a tendency to favour book production and marketing tactics that scale. This makes sense, but, sometimes, the activities that engage fans the most don’t scale. A unique, personal touch can drive some fans to buy all your books, badger movie producers and push to get your merch stocked at their places of work, all of which provide an immeasurable return on investment. So, consider the personal, artisan touch, even if only for competition winners. As poet Maya Angelou once said, “People will forget what you said, people will forget what you did, but people will never forget how you made them feel.”

Daniel Parsons
Dan Parsons is the bestselling author of multiple series. His Creative Business books for authors and other entrepreneurs contains several international bestsellers. Meanwhile, his fantasy and horror series, published under Daniel Parsons, have topped charts around the world and been used to promote a major Hollywood movie. For more information on writing, networking, and building your creative business, check out all of Dan’s non-fiction books here.
Grab Your SPF Freebies!
Sign up to receive your SPF starter package, which includes a free 3 part video series on getting started with FB ads, and inspirational and educational weekly emails.